Button Maker
Introduction
In this project we did not have to design anything, but instead needed to use our CAD modeling skills to recreate a button maker. The dimensions were provided for us in a PLTW file, and then we had to make the parts in Autodesk Inventor before creating an assembly of the button maker.
In this project we did not have to design anything, but instead needed to use our CAD modeling skills to recreate a button maker. The dimensions were provided for us in a PLTW file, and then we had to make the parts in Autodesk Inventor before creating an assembly of the button maker.
Working Drawing
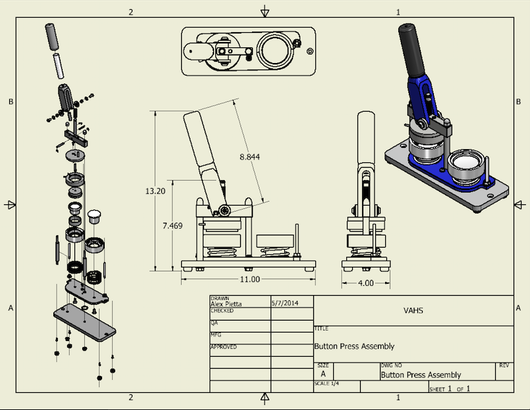
The Inventor drawing to the left shows exploded and assembled views of the final button maker, as well as some general size dimensions. To start making the button maker, I had to make small sub-assemblies using parts I made in the program. Then I put those sub-assemblies together into a final assembly, and used a few parts on file to attach them together.
The Inventor drawing to the left shows exploded and assembled views of the final button maker, as well as some general size dimensions. To start making the button maker, I had to make small sub-assemblies using parts I made in the program. Then I put those sub-assemblies together into a final assembly, and used a few parts on file to attach them together.
Method
Although we did not have to create an idea of our own, this project still required us to use critical thinking and problem solving skills to make the pieces. Some of the parts forced us to use new techniques in Autodesk Inventor, and we had to use calculations to find a few dimensions on certain parts. After creating the parts, we also assigned materials to each part (steel, stainless steel, rubber, etc.) so it could be as realistic as possible.
Although we did not have to create an idea of our own, this project still required us to use critical thinking and problem solving skills to make the pieces. Some of the parts forced us to use new techniques in Autodesk Inventor, and we had to use calculations to find a few dimensions on certain parts. After creating the parts, we also assigned materials to each part (steel, stainless steel, rubber, etc.) so it could be as realistic as possible.
Conclusion
This project helped me fine tune my CAD modeling skills, and made me feel confident for doing other projects in Inventor. Creating this button maker was a great experience. It showed me how it might be to take someone else's design and use their dimensions to recreate it. This kind of thing would be important for sending your designs to someone else. Overall, I learned a lot from this project and it was very fun to do.
This project helped me fine tune my CAD modeling skills, and made me feel confident for doing other projects in Inventor. Creating this button maker was a great experience. It showed me how it might be to take someone else's design and use their dimensions to recreate it. This kind of thing would be important for sending your designs to someone else. Overall, I learned a lot from this project and it was very fun to do.
